Encouraging soil microbes and other creatures together with fungi by adding organic material such as compost to your plantings is beneficial to your plants. Together they make nutrients available to the roots of your plants, reducing or eliminating entirely the need to apply fertiliser. A soil more rich in organic matter will retain moisture for longer and drain better during heavy rain. Mulching your plant beds with compost annually in spring will reduce weeding. Furthermore, the soil borne creatures will do the job of incorporating this material into your soil without the need to cultivate to the soil: cultivation damages the soil and releases carbon into the amosphere.
In this day and age we are encouraged to think about the waste we produce and our impact on the environment and climate. Reusing and recycling organic matter in the garden reduces your carbon footprint by not relying on commercially produced compost, which itself has a carbon footprint in its manufacture, its delivery to the shop and your travel to the shop to purchase. Producing your own compost avoids the plastic sacks that commerical compost is packaged in. It also reduces the need to travel to the déchèterie to dispose of your green waste, especially if combined with on site chipping, or incinerating the larger plant material.
It is also a fun activity the kids can get involved with to help them think about food waste and environmental issues.
Is a composter essential?
Compost can be simply an open heap left to decompose over time, but a contained heap will not only be a much neater and attractive solution, it can help to retain heat that helps to accelerate the process.
I have three gardens to maintain and tend to so I have chosen to construct three bays 1.2m wide and deep and about 90cm tall each, so that I can in theory produce nearly a ton of compost per bay. You can alter the measurements, larger or smaller, as required for your space.
If you want to garden organically you will need to avoid treated (tanalised) woods. Instead use untreated woods that are naturally slow to decay, such as chesnut or oak.
You will need:
- A minimum of 8.4 metres of corrugated iron, preferably second hand. This will add to the rustic charm with a unique patina and will reduce your carbon footprint. If you want to build your bays higher to 1.2m tall then you will need additional materials to add an additional layer.
- 10 untreated chestnut posts 1.6m long and between 8 and 10cms in diameter.
- Various untreated planks cut to lengths of 1.15m.
- Galvanised wood screws and washers. I used 32 of each in this project. Screws about 35 or 40mm long and about 4 to 4.5mm diameter is fine. I prefer torx head screws, I just seem to get on better with these; they seem to drive into the post much more securely without the bit slipping and wearing the head.
- 3 small bolts with nuts approximately 5 or 6mm in diameter and around 35mm long.
- A spade, or post hole digger. If the soil is very stony, as it very often is in this part of France, a pickaxe may be required.
- A club hammer.
- A combi drill/screwdriver with drill bits capable of drilling metal.
- An angle grinder with metal cutting blade.
- A work bench with clamps.
- A tape measure.
- A marker pen.
- Line marker paint.
- A builder’s 3/4/5 right angled triangle (although not essential as you can calculate a right angle with just a tape measure and a little maths).
- Spirit level.
- PPE safety goggles, gloves and ear defenders.
Allow a day to undertake this task so that you are not rushing when using dangerous cutting tools and to allow for the ground being difficult to work.
- Choose a location that is relatively level and in an area of shade or part shade. This is usually one of the quieter areas of the garden in any event and will help the heap to maintain moisture during warmer weather. Some moisture is needed to help the composting process along.
- For a composter the same as mine, in your chosen location mark out a base line of 3.6m. Using line marking paint will make this task easier. This line is where the rear panels of the composter will be positioned.
- At the start, end and every 1.2m in between along this line make more lines at right angles to your base line also 1.2m long. I used a marking out 3/4/5 right angled triangle to ensure that these lines were true. These lines represent the basic footprint of your bays. You should end up with two lines at each end which represent the location of the sides of your composter, with two more lines equally dividing the space between to form the footprint of three bays.

- It is now time to insert 4 posts along your baseline. Starting from the left, dig a hole for each post inside the top left corner of each bay you have marked. A post hole digger will help you keep these holes to a modest size so that you have less soil to remove and reinsert every post. Dig each hole to approximately 40cm deep.
- For the final post on the right side of your composter, ensure that this is placed in the top right corner instead. It needs to be this side so that the panel can fix to the side without the post showing, although you could situate your posts as you have done with all the others if you think you might add a 4th bay in time.
- With the club hammer drive each post into the hole just to help secure them. Each post should be 40cm deep in the ground/proud of the ground by 1.2m. Backfill the holes with the soil you have removed and firm around base of the post with your heel. You may find that the posts are not perfectly level at this stage, but this does not matter at this stage and in any event the chesnut posts are quite likely a bit wonky anyway, which all adds to the charm.
By now your project should look something a bit like this:

- Now start the holes for your posts at the front of the bays to which your sides and internal dividers will attach by making holes that terminate at the end of each line. Again starting from the left, the first hole needs to be situated to the right of your side line. Make the hole so that the middle of the post meets near the end of the line. This will help you with securing the side panels later and will ensure the screws go through the centre of the post, rather than the edge of it. As before the hole will need to be 40cm deep.
- The next two lines will require a post hole either side of the end of each line to support the dividing panels and hold in place your retaining planks.
- The final hole will need to be positioned at the end of the line, but to the left of it so that your project now looks something like this (albeit we have not yet fixed the rear panels):

- Insert and secure each front post with a few taps of your club hammer and back fill the soil and firm with your heel around the base of each post as before.
- Check all posts are level in relation to the rear posts and one another with a spirit level. Adjust as necessary.
We now have the basic structure to which we can start thinking about fixing the panels. Corrugated iron typically comes in lengths around 2.5m to 3m long and 90cm wide.
- Take your first panel and offer it up to the rear posts. With the marker pen mark the position of the holes for each post. Mark three holes somewhere near the top of the panel, somewhere near the middle and one near the bottom. You will need a middle one to stop the lateral force of the compost bowing out the panel sides. Make your mark in one of the panel’s troughs, rather than on a crest (i.e. the dip, not the bump). You will get a firmer and neater connection with the wood post. Do this for each post.
- Offer up another sheet of corrugated iron at the opposite end, overlapping the first panel. Check it is level with your spirit level. Mark up the holes against the post, as before. Also mark the location of three holes (top, middle and bottom) where you will be placing bolts to hold the two overlapping sheets together.
- Using a 5mm metal drill bit, where you have made your marks with the marker pen, drill holes in the panels.
- Offer the first panel up to the posts again. Thread your wood screw with a washer and screw the panel into place to each post. Use your spirit level as you go to ensure the panels are not wonky.
- Offer up the second panel overlapping the first panel. Screw to the posts as before.
- Secure the overlapping panels to one another by inserting a bolt in each hole you have made and secure with a nut on the other side. This not only makes the join neater and more attractive, it also avoids the panels bulging apart under the weight of the compost.
- Next, using your angle grinder, cut from your remaining corrugated iron panels 4 lengths that are 1.2m long.
- Once cut, offer these up to the posts as before and mark the position of your holes with a marker pen. Make sure that you choose a different location to the screws you have inserted at the rear to avoid them coming together. The internal dividers will be supported by the double posts at the front so there is only need for one hole at the top of the panel here just to hold it level. Make your holes in the troughs only.
- Drill the holes and screw each to the posts, as before. Check levels with a spirit level before screwing the panels in place.
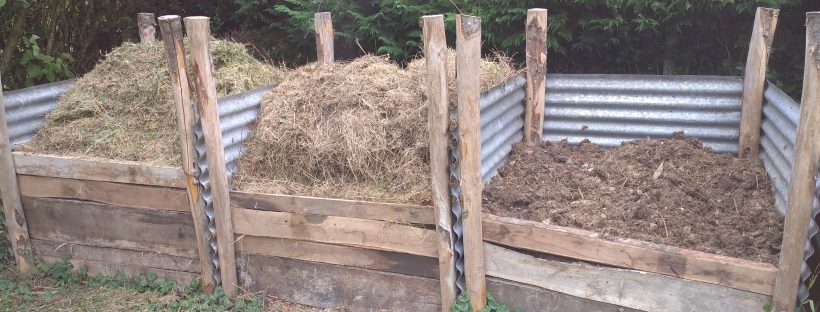
What you should now have is something looking like this:

- Cut the posts to a point just above the top of the corrugated iron, or leave them, if like me, you think you may want to increase the height of each bay in time to accommodate more compost.
- As you start to use your heap, use planks of wood 1m15 long slotted behind the front posts to help retain the material in each bay and stop it falling out everywhere, like so:

Alternatives
This is just the basic format. For something more bespoke you could choose square posts, use pallets instead of corrugated iron, the sky’s the limit. A wormery is another option.
What to put in the composter?
Generally most waste foods, except bones, meat, fish and bread (avoid these as they will attract vermin and swarms of flies), can be put in a composter.
Plant material (there seems to be some debate as to whether weeds and diseased material can be added) is a given. Try to balance out dry brown plant material, with lush green, such as lawn clippings to avoid creating a stinky, wet mush.
Cardboard (the non-plasticky type) such as egg or delivery boxes (with the sealing tape removed) is a great addition to the pile and stops it becoming too wet and mushy.
Ash, a source of carbon and potash, from the log burner can also be added.
I had heard that whilst turning compost is good to introduce oxygen and prevent anerobic conditions from stalling the necessary bacterial and microbial processes, it does in fact release carbon into the atmosphere each time. Although I have 3 bays I shall for the time being experiment with using just two of the bays and the third a more long term option for leafmold, perhaps only using the third bay for composting if the process is not happening quickly enough/stalling.
For all things compost related, and further learning about compost (indeed all things potager related), I recommend you follow Charles Dowding the godfather of ‘No Dig’ gardening.
If you feel that this project is beyond your capability, or like too much time/hard work, you can always ask us to build one for you by getting in touch here.
No responses yet